Create a Web Page 101
Making Web Pages Intro
What is a Web Page?
Why Make a Web Page?
The History of HTML
Learn HTML or XHTML?
Basic HTML
Basic HTML Tutorials
Basic HTML Necessities
How to Make a Web Page
How to Edit a Web Page
The Basics of HTML Tags
Basic HTML Page Structure
HTML Attributes
HTML Font Codes
HTML Font Codes Intro
HTML Font Color Codes
HTML Font Size Codes
HTML Font Style Codes
HTML Bold/Italic Codes
Combining Font Codes
Formatting Text
Formatting Text Intro
Making Paragraphs
Miscellaneous Formatting
Headings & Subheadings
Creating Hyperlinks
Using Graphics
Using Graphics on the Web
Add Graphics to Your Pages
Graphics and Accessibility
How to Align Graphics
Page Color & Background
Graphics as Hyperlinks
Horizontal Rules
Creating Tables
HTML Tables Tutorials
HTML Table Fundamentals
Background & Border Color
Table Frames & Rules
Table Width and Alignment
Cells 1 -Space & Alignment
Cells 2 -Row Column Span
Cells 3 -Width & Height
Making Lists
HTML Frames
HTML Frames Tutorials
Using Frames for Layout
Advanced Frame Layouts
Putting Hyperlinks in Frames
Frame Border Width
Color, Margin and Control
Problems with Frames
SmartFrames: A Solution
SSI: An Alternative to Frames
Web Page Forms
Making Feedback Forms
A Simple Feedback Form
Installing NMS FormMail
Debugging Your Setup
My Web Host is Out to Lunch
User Input Components
Text Fields
Checkboxes & Radio Buttons
Dropdown Menus
Push Buttons
Layout and Presentation
Basic CSS
Basic CSS Tutorials
What is CSS?
Why You Should Use CSS
How to Use CSS
Inline Styles
Embedded Style Sheets
External Style Sheets
Class Selectors
ID Selectors
Combining Selectors
CSS Properties
CSS Properties Intro
Font Styles
Width, Height & Spacing
Borders
Backgrounds
Position
Float & Alignment
Hyperlinks
All About Web Hosting
Hosting Your Own Website
What is a Web Host?
Your Website's Home Page
Building a Website Offline
About Free Web Hosting
Best Free Web Hosting
Commercial Web Hosting
How to Get a Domain Name
Ecommerce Web Hosting
Web Hosting Terminology
Free Web Design Tools
Best Free Website Tools
Best Free Text Editors
Best Free Graphics Editors
Free Website Analysis Tools
Setting Up HTML Kit
HTML Kit Introduction
How to install HTML Kit
Screenshot Breakdown
Basic Configuration
Overall Appearance
Shortcuts and Startup
Editing Window
Customizing Toolbars
Using the Favorites Tab
Making a New Actions Bar
Odds and Ends
Free Templates
Free Website Templates
Two Column Fixed Width
Three Column Liquid Layout
Miscellaneous Templates
Dynamic Menu Effects
Two Column Experimental
Terms of Use
About These Templates
Website Templates Help
Getting Started
Template Zip File Download
How to Edit Your Template
What to Edit in the HTML
How to Add Your Logo
Making a Website
Web Design Tips
Web Design Basics
Tables vs. Tableless
Using Tables for Layout
Example Table Layouts
World's Crappiest Web Page
Twitter Backgrounds
Twitter Backgrounds Intro
Cool Twitter Backgrounds
Cool Twitter Backgrounds 2
Plain Twitter Backgrounds
Dark Twitter Backgrounds
Best Twitter Backgrounds
Cute Twitter Backgrounds
Music Twitter Backgrounds
Music Twitter Backgrounds 2
Twitter Backgrounds 101
TERMS OF USE
All About Web Browsers
What is a Web Browser?
Mozilla Firefox
Internet Explorer
Opera
How to Set Up Firefox
Top 5 Firefox Extensions
Contact
Customizing Toolbars
I should mention once again that this is not really a help file but rather a configuration plan. This is simply the way I saw fit to make things happen in HTML Kit and by now you have probably realized that there are eleventy billion ways to do this. So you can either follow this plan closely or use it as a springboard to create your own plan.
For your convenience, here is...
A List of all My Toolbars Configurations
- Removing buttons from the Toolbars
- Creating a new toolbar
- Adding new buttons to Toolbars
- Displaying text instead of icons on Toolbars
- Inserting dividers between Toolbars buttons
If you would like to see details about why I did what, just click on the buttons marked More Information Please...
Alright then let's do it to it...
Removing buttons from the Toolbars
MOVE OVER...
I knew I was going to go a little ga-ga creating new toolbars and toolbar buttons so I decided to do away with every toolbar button that I did not frequently use in order to make space. All these buttons can be found on the Main Menu anyways so it's not like I'm making them completely inaccessible. Rather, I'm just resetting the priorities.
In my books, the following simply do not represent priorities and in my humble opinion are not worthy of taking up coveted space in the Toolbars section:
- Open URL button

- If I want to open an online web page, I'll just use 'Edit with HTML Kit' in the IE drop-down File menu.
- Print file button

- On the rare occasion that I actually want to print one of my HTML documents, I can always use File » Print. I don't need a toolbar button for this.
- Select button

- Nice features but I've become so accustomed to the click-and-drag method of selecting text that I'm not sure it would represent a time-saver to acclimatize myself to these options. About the only one that really caught my eye was 'Select content between tags' and this is already defined as a keyboard shortcut by default (Shift + Ctrl + T).
- Preferences button

- I'm not really deleting this button altogether but rather just moving it over to a new custom-made toolbar called 'Control Panel'.
(The following will remove the Open URL button and the Print button from the File toolbar and the Select button and the Preferences button from the Edit toolbar.)
Right click anywhere in the Toolbars section
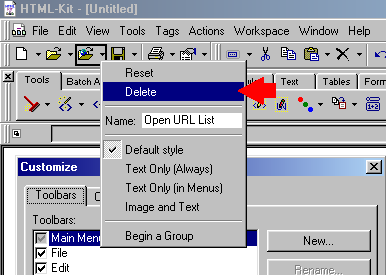
Click on Customize...Right click on the Open URL button
Click on Delete

Right click on the Print button
Click on Delete
Right click on the Select button
Click on Delete
Right click on the Preferences button
Click on Delete
Click Close on the Customize dialog.
This will put a space between the File toolbar and the Edit toolbar. You can just click and hold on the double vertical line on the left side of the Edit toolbar and slide it over flush against the File toolbar.

RESET TOOLBARS
Ooops!
Made a mistake or changed your mind about what to do?
Want to go back to the default Toolbars configuration?
Click on Tools » Customize » Reset Toolbars
^ Back to list ^
Creating a new toolbar
OH BOY! A NEW TOY!...
I found that I was constantly searching around for the Customize button (I know... it's right there- Tools » Customize... What can I say? I guess I had some kind of mental block about remembering this... heh...) Also I didn't like the Preferences button on the Edit toolbar.
Moreover, the Task Bar icons that I deleted earlier had functions that I still wanted readily accessible, i.e. toggle on and off the Actions Bar, Messages Window or Workspace. The only reason I elected not to display them in the Task Bar was because they were much too tiny to allow for easy identification.
Hence I came up with the idea to create a custom-made toolbar called 'Control Panel' and put all this stuff there. Then I would have quick and easy access to all the buttons associated with configuring HTML Kit and they would all be located in the same area of the HTML Kit dashboard.
Right click anywhere in the Toolbars section
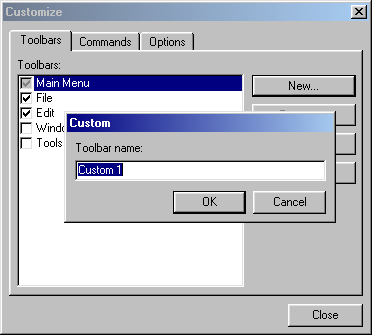
Click on Customize...Click on New...
In the Toolbar name: box, delete "Custom 1" and type in "Control Panel" (without the quotation marks)

Click OK to create.
Your new "Control Panel" toolbar will appear in its infant state as a little box right next to the Customize dialog. It will look like this:
Click and hold anywhere on it (except on the 'x') and then drag it up top to dock it beside the other toolbars.
I suggest you keep the Customize dialog open and move right on to the next step...
^ Back to list ^
Adding new buttons to Toolbars
LIKE A KID IN A CANDY STORE...
I pretty much explained the whys and wherefores about the buttons being added to the new custom Control Panel toolbar in Creating a new toolbar.
But why stop there?
Since all the default HTML Kit toolbars can also take on new buttons then I figured they could use a couple of new additions as well.
I definitely considered the Insert button on the File drop-down menu a high priority since this would allow me to quickly insert templates into a blank document or insert frequently used snippets of code (which is the next best thing to creating plugins).
I also wanted a Save All button since I often work with multiple documents open and I'm usually dashing back and forth all over the place making a touch-up here and doing a little spit-shine there. Save All, as the name clearly implies, saves all open documents to disk in one fell swoop. Definitely a high priority.
SAVING SNIPPETS
To save a snippet of code, e.g. a frequently used hyperlink anchor or table configuration, select the code in the Editing Window and then click on File » Save Selection » Save Selection As Snippet.... Type the name of the snippet (whatever you like) in the Title box and then click OK (See Saving Templates for more information)
Assuming that you still have the Customize dialog open from the previous step...
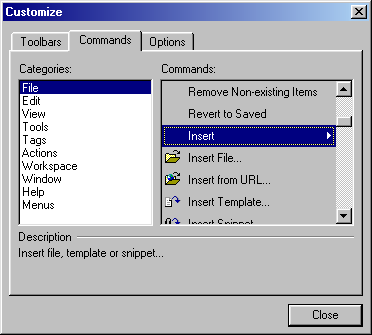
Click on the Commands tab
If not then right click anywhere in the Toolbars section
Click on Customize...Then click on the Commands tab
Now...
In the Categories: box, "File" should be selected by default. If not, click to select it.
In the Commands: box, scroll down to locate "Insert".

Click and hold on "Insert" and drag it clean off the Customize dialog and hover it over the File toolbar. You'll see a little vertical black line on the File toolbar indicating where it will be placed when you drop it in.
Line it up just to the right of the 'Create a new file' icon
Return to the Commands: box on the Customize dialog and scroll down to locate "Save All". Do the same thing as you did with the "Insert" button, i.e. drag and drop it onto the File toolbar.
Your new File toolbar should now look like this:
Alright now, let's populate our custom-made Control Panel toolbar with some buttons...
Return to the Customize dialog (in case you closed it, right click on any Toolbars button and click on 'Customize')
On the Commands tab in the Categories: box, click to select "Edit"
Next to this, in the Commands: box, scroll down to locate "Preferences List".
Drag and drop "Preferences List" onto the newly created Control Panel toolbar
In the Categories: box, click to select "Tools"
In the Commands: box, scroll down to locate "Customize"
Drag and drop "Customize" onto the newly created Control Panel toolbar
In the Categories: box, click to select "View"
In the Commands: box, scroll down to locate "Actions Bar"
Drag and drop "Actions Bar" onto the newly created Control Panel toolbar
In the Commands: box, scroll down to locate "Show Tabs Bar"
Drag and drop "Show Tabs Bar" onto the newly created Control Panel toolbar
In the Commands: box, scroll down to locate "Messages"
Drag and drop "Messages" onto the newly created Control Panel toolbar
In the Commands: box, scroll down to locate "Workspace"
Drag and drop "Workspace" onto the newly created Control Panel toolbar
Note that while keeping the Customize dialog open, you can rearrange the order of the icons on toolbars by dragging and dropping the button left or right on the respective toolbar. I prefer to order the Control Panel toolbar icons like this from left to right:
Preferences, Customize, Actions Bar, Show Tabs, Messages, WorkspaceOnce you have finished adding all the new buttons, close the Customize dialog.
Your new Control Panel toolbar should look something like this:
Now then to summarize what we just created...
If you click on the Preferences icon
TOGGLE YOUR NEW CONTROL PANEL TOOLBAR ON AND OFF
Click on View » Toolbars » Control Panel
^ Back to list ^
Displaying text instead of icons on Toolbars
PICTURES AREN'T ALWAYS BETTER
Sometimes a whole bevy of icons can have a real mind boggling effect and can stunt the creativity as you struggle to remember what each cute little picture is supposed to represent. Instead of having a whole string of icons, I prefer to interject a few text buttons now and then to break things up and help jog the memory. For this reason, I chose to display the Preferences button as text only. I know this is squandering precious space in the Toolbars section but I don't readily associate that little hand-and-paper icon with Preferences.
Right click anywhere in the Toolbars section
Click on Customize...Right click on the Preferences button
Click on Text Only (Always)
You will now have just a text button saying "Preferences List" (don't close the Customize dialog just yet...)
Right click on the "Preferences List" text button.
In the Name: box, delete "Preferences List" and type in "Preferences".
Press Enter on your keyboard to apply the name change.
Close the Customize dialog.
Your new Control Panel toolbar should now look like this:
(NOTE: For some reason, HTML Kit won't permit you to display the Customize button as text only otherwise I would have done this too.)
^ Back to list ^
Inserting dividers between Toolbars buttons
GETTIN' FANCY...
Alright. Alright. Guilty as charged. This is purely for aesthetic reasons. But hey... They give you the option. Why not use it? Let's make sumpin' purty just for the heck of it...
Note: This is typically used to denote a group of buttons. Thus the idea is to place a divider at the beginning of a group and then place another divider at the beginning of the next group. In this capacity the divider has a more practical purpose. However I liked to use this option to draw lines between individual buttons just for... well... like I said... *ahem*... Purely aesthetic.
Right click anywhere in the Toolbars section
Click on Customize...Right click on the Customize button
Click on Begin Group
Right click on the Actions Bar button
Click on Begin Group
Close the Customize dialog.
Your new Control Panel toolbar should now look like this:
^ Back to list ^
Fun eh?
So what about that ole' Actions Bar? It's been sitting there in the wings throughout this tutorial looking all big and bad and sophisticated as if to say, Nyaah, nah, nah-nah, nahh! You can't touch this!
Well I've got news for you, friend...
OOOH YES WE CAN!...
Web Hosting 101
Learn about web hosting without the technobabble!
What is Web Hosting?
Best Free Web Hosting
Affordable Domain Names
Affordable Web Hosting
See also:
How to Make a Web Page
Free Website Templates
If you need a .COM web address, you can get one quick and easy at...
| <~ BACK | TOP | NEXT ~> |