Create a Web Page 101
Making Web Pages Intro
What is a Web Page?
Why Make a Web Page?
The History of HTML
Learn HTML or XHTML?
Basic HTML
Basic HTML Tutorials
Basic HTML Necessities
How to Make a Web Page
How to Edit a Web Page
The Basics of HTML Tags
Basic HTML Page Structure
HTML Attributes
HTML Font Codes
HTML Font Codes Intro
HTML Font Color Codes
HTML Font Size Codes
HTML Font Style Codes
HTML Bold/Italic Codes
Combining Font Codes
Formatting Text
Formatting Text Intro
Making Paragraphs
Miscellaneous Formatting
Headings & Subheadings
Creating Hyperlinks
Using Graphics
Using Graphics on the Web
Add Graphics to Your Pages
Graphics and Accessibility
How to Align Graphics
Page Color & Background
Graphics as Hyperlinks
Horizontal Rules
Creating Tables
HTML Tables Tutorials
HTML Table Fundamentals
Background & Border Color
Table Frames & Rules
Table Width and Alignment
Cells 1 -Space & Alignment
Cells 2 -Row Column Span
Cells 3 -Width & Height
Making Lists
HTML Frames
HTML Frames Tutorials
Using Frames for Layout
Advanced Frame Layouts
Putting Hyperlinks in Frames
Frame Border Width
Color, Margin and Control
Problems with Frames
SmartFrames: A Solution
SSI: An Alternative to Frames
Web Page Forms
Making Feedback Forms
A Simple Feedback Form
Installing NMS FormMail
Debugging Your Setup
My Web Host is Out to Lunch
User Input Components
Text Fields
Checkboxes & Radio Buttons
Dropdown Menus
Push Buttons
Layout and Presentation
Basic CSS
Basic CSS Tutorials
What is CSS?
Why You Should Use CSS
How to Use CSS
Inline Styles
Embedded Style Sheets
External Style Sheets
Class Selectors
ID Selectors
Combining Selectors
CSS Properties
CSS Properties Intro
Font Styles
Width, Height & Spacing
Borders
Backgrounds
Position
Float & Alignment
Hyperlinks
All About Web Hosting
Hosting Your Own Website
What is a Web Host?
Your Website's Home Page
Building a Website Offline
About Free Web Hosting
Best Free Web Hosting
Commercial Web Hosting
How to Get a Domain Name
Ecommerce Web Hosting
Web Hosting Terminology
Free Web Design Tools
Best Free Website Tools
Best Free Text Editors
Best Free Graphics Editors
Free Website Analysis Tools
Setting Up HTML Kit
HTML Kit Introduction
How to install HTML Kit
Screenshot Breakdown
Basic Configuration
Overall Appearance
Shortcuts and Startup
Editing Window
Customizing Toolbars
Using the Favorites Tab
Making a New Actions Bar
Odds and Ends
Free Templates
Free Website Templates
Two Column Fixed Width
Three Column Liquid Layout
Miscellaneous Templates
Dynamic Menu Effects
Two Column Experimental
Terms of Use
About These Templates
Website Templates Help
Getting Started
Template Zip File Download
How to Edit Your Template
What to Edit in the HTML
How to Add Your Logo
Making a Website
Web Design Tips
Web Design Basics
Tables vs. Tableless
Using Tables for Layout
Example Table Layouts
World's Crappiest Web Page
Twitter Backgrounds
Twitter Backgrounds Intro
Cool Twitter Backgrounds
Cool Twitter Backgrounds 2
Plain Twitter Backgrounds
Dark Twitter Backgrounds
Best Twitter Backgrounds
Cute Twitter Backgrounds
Music Twitter Backgrounds
Music Twitter Backgrounds 2
Twitter Backgrounds 101
TERMS OF USE
All About Web Browsers
What is a Web Browser?
Mozilla Firefox
Internet Explorer
Opera
How to Set Up Firefox
Top 5 Firefox Extensions
Contact
How to Install HTML Kit
The following will help you install HTML Kit to your computer. I'm assuming that you're using Windows 95, 98, ME, NT 4, 2000 or XP and that you've already taken it upon yourself to download the HTML Kit setup file.
My suggested settings here are by no means official but rather intended to streamline your HTML Kit installation and get you up and running as fast as possible. This installation tutorial was written on April 28th, 2004 and applies to HTML Kit - build 292.
Installation in a Nutshell
If you're well accustomed to installing stuff to your computer then —in a nutshell— what I describe in the following is to go with all the defaults until you hit the Confirm screen:
Then answer NO to all the questions, start up HTML Kit and create a new file. You will now be looking at something like this:
Screenshot of HTML Kit - Default setup

Bear in mind that I've resized the program window so that the screenshot can fit on this web page.
On the other hand maybe you would prefer...
Detailed Step-by-step Instructions
No problem-o.
Okay then, here we go...
- CLOSE ALL PROGRAMS on your computer and then, beginning at the Start Menu button (bottom left), click on Start » Run » Browse.... Navigate to where you saved your HTML Kit setup file (HKSetup.exe). Click to select it and then click Open on the Browse dialog and click OK on the Run dialog. You will now get a little pop-up dialog saying:
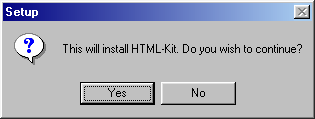
Click "Yes".
- You will now be confronted with HTML Kit Setup Wizard splash screen advising you to close all other programs before continuing. If all other programs are indeed shut down then click 'Next' on the HTML Kit Setup Wizard.
- At the License Agreement screen, read the license and if you agree (of course you do) then click "Yes".
- At the Select Destination screen, you can choose which directory into which you would like to install HTML Kit. The default is
C:\Program Files\Chami\HTML-Kit. If this is okay with you then this will do fine. Click "Next".
- At the Select Components screen, you can decide on the kind of installation you wish to proceed with. The default is Full Installation (highly recommended). I also recommend this. Click "Next".
- At the Select Start Menu Folder screen, you may choose where to install shortcuts to HTML Kit on your Windows Start Menu. You can always change all these shortcuts later so once again, just go with the defaults and simply click "Next".
- At the Ready to Install screen, click "Install". Your computer will now install HTML Kit. This will take a moment or two.
- Once the installation is complete, you will see a screen saying:
"Setup has finished installing HTML Kit to your computer."
You now have a choice of clicking to check or clear two boxes. The default is:
- Start HTML Kit (box checked)
- Download optional plugins and other add-ons from the web (box cleared)
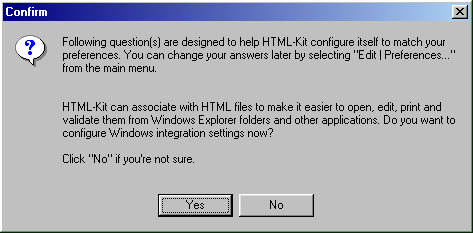
- At the Confirm screen, it will explain:
...and then you will be submitted to a gruelling interrogation spanning several screens. But I'll just give you all the answers right now:
- HTML Kit can associate with HTML files to make it easier...? (Click "NO")
- HTML Kit can auto-detect browsers and HTML editors...? (Click "NO")
- HTML Kit can download links...? (Click "NO")
- HTML Kit can verify if you're using the latest version...? (Click "NO")
- Would you like to take a web tour? (Click "NO")
- You will now be at the Open File Wizard dialog (almost there...)
The Create New File radio button will be selected by default and this will do fine so just leave everything on this screen as is for now. Leave the Don't display this screen again box checked for now. We'll change this option later.
Click "OK".
Boom.
You're in.
You will now be looking at something like this:
Bear in mind that I've resized the program window so that the screenshot can fit on this web page.
Sooooo...
That's some dashboard full of controls, eh?
Don't worry. Hang with me and you'll have this beast trained in no time.
First let's take a close look at the program interface...
Web Hosting 101
Learn about web hosting without the technobabble!
What is Web Hosting?
Best Free Web Hosting
Affordable Domain Names
Affordable Web Hosting
See also:
How to Make a Web Page
Free Website Templates
If you need a .COM web address, you can get one quick and easy at...
| INTRO | TOP | NEXT ~> |