Create a Web Page 101
Making Web Pages Intro
What is a Web Page?
Why Make a Web Page?
The History of HTML
Learn HTML or XHTML?
Basic HTML
Basic HTML Tutorials
Basic HTML Necessities
How to Make a Web Page
How to Edit a Web Page
The Basics of HTML Tags
Basic HTML Page Structure
HTML Attributes
HTML Font Codes
HTML Font Codes Intro
HTML Font Color Codes
HTML Font Size Codes
HTML Font Style Codes
HTML Bold/Italic Codes
Combining Font Codes
Formatting Text
Formatting Text Intro
Making Paragraphs
Miscellaneous Formatting
Headings & Subheadings
Creating Hyperlinks
Using Graphics
Using Graphics on the Web
Add Graphics to Your Pages
Graphics and Accessibility
How to Align Graphics
Page Color & Background
Graphics as Hyperlinks
Horizontal Rules
Creating Tables
HTML Tables Tutorials
HTML Table Fundamentals
Background & Border Color
Table Frames & Rules
Table Width and Alignment
Cells 1 -Space & Alignment
Cells 2 -Row Column Span
Cells 3 -Width & Height
Making Lists
HTML Frames
HTML Frames Tutorials
Using Frames for Layout
Advanced Frame Layouts
Putting Hyperlinks in Frames
Frame Border Width
Color, Margin and Control
Problems with Frames
SmartFrames: A Solution
SSI: An Alternative to Frames
Web Page Forms
Making Feedback Forms
A Simple Feedback Form
Installing NMS FormMail
Debugging Your Setup
My Web Host is Out to Lunch
User Input Components
Text Fields
Checkboxes & Radio Buttons
Dropdown Menus
Push Buttons
Layout and Presentation
Basic CSS
Basic CSS Tutorials
What is CSS?
Why You Should Use CSS
How to Use CSS
Inline Styles
Embedded Style Sheets
External Style Sheets
Class Selectors
ID Selectors
Combining Selectors
CSS Properties
CSS Properties Intro
Font Styles
Width, Height & Spacing
Borders
Backgrounds
Position
Float & Alignment
Hyperlinks
All About Web Hosting
Hosting Your Own Website
What is a Web Host?
Your Website's Home Page
Building a Website Offline
About Free Web Hosting
Best Free Web Hosting
Commercial Web Hosting
How to Get a Domain Name
Ecommerce Web Hosting
Web Hosting Terminology
Free Web Design Tools
Best Free Website Tools
Best Free Text Editors
Best Free Graphics Editors
Free Website Analysis Tools
Setting Up HTML Kit
HTML Kit Introduction
How to install HTML Kit
Screenshot Breakdown
Basic Configuration
Overall Appearance
Shortcuts and Startup
Editing Window
Customizing Toolbars
Using the Favorites Tab
Making a New Actions Bar
Odds and Ends
Free Templates
Free Website Templates
Two Column Fixed Width
Three Column Liquid Layout
Miscellaneous Templates
Dynamic Menu Effects
Two Column Experimental
Terms of Use
About These Templates
Website Templates Help
Getting Started
Template Zip File Download
How to Edit Your Template
What to Edit in the HTML
How to Add Your Logo
Making a Website
Web Design Tips
Web Design Basics
Tables vs. Tableless
Using Tables for Layout
Example Table Layouts
World's Crappiest Web Page
Twitter Backgrounds
Twitter Backgrounds Intro
Cool Twitter Backgrounds
Cool Twitter Backgrounds 2
Plain Twitter Backgrounds
Dark Twitter Backgrounds
Best Twitter Backgrounds
Cute Twitter Backgrounds
Music Twitter Backgrounds
Music Twitter Backgrounds 2
Twitter Backgrounds 101
TERMS OF USE
All About Web Browsers
What is a Web Browser?
Mozilla Firefox
Internet Explorer
Opera
How to Set Up Firefox
Top 5 Firefox Extensions
Contact
Editing Window
With all due respect, I found the default set-up of HTML Kit kind of clunky and cluttered. However, the program wonderfully redeemed itself in the configuration department since it offered all kinds of choices on the handling of multiple document windows, engaging word wrap, turning on and off all the components, setting the HTML color coding and a whole bunch of other stuff. I would have given it a perfect score but for one small glitch with the auto-wrap option.
Maximize the Editing Window and configure the Task Bar
ELBOW ROOM
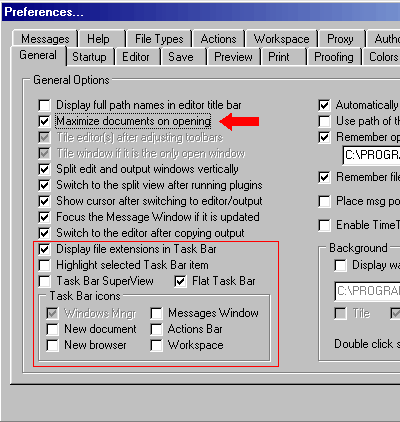
I personally prefer to work with Editing Window maximized instead of tiling or cascading windows to handle multiple documents (more-space-less-clutter). The Task Bar can easily accomodate the need to switch between open documents. Also, here's a rundown of the Taskbar options on the General tab:
- Display file extensions in task bar
- My preference: [check] (default)
What it does: File names displayed in respective Task Bar buttons are shown with file extensions. - Highlight Selected Task Bar item
- My preference: [clear] (default)
What it does: Selected button in Task Bar is not highlighted. - Taskbar Superview
- My preference: [clear]
What it does: Click to check will display full system path to the file in its respective Task Bar button. Click to clear will display just the file name. (Note: Hovering over a file's Task Bar button will display its full system path in Status Bar anyway.) - Flat Task Bar
- My preference: [check] (default) Flattens buttons for all documents except the one currently showing in Editing Window which will appear depressed. Clearing this box will display the buttons with a raised 3D effect.
- Task Bar icons
- My preference: [clear] ALL (see Figure 1)
What it does: This will clear all the icons off the far left of the Task Bar (a.k.a. the 'Action Box'). I found that these icons were just too teeny tiny to suit my purposes and I could never remember which was which necessitating hovering over each one to read the associated tooltip. Hence I did away with them on the Task Bar and replicated them on a custom-made toolbar with bigger buttons. Also my intent was to maximize the available space on the Task Bar. - Display Recall Menu (Behavior tab)
- My preference: [clear]
What it does: Clicking on the Recall Menu button (appears in far left area of the Task Bar after using the Tags Wizard) will reveal a drop-down menu containing all the actions invoked from the Actions Bar in the current session. I thought this was a real cool feature until I realized that my Recall Menu list very quickly got very BIG. I decided then that it was better (and more fun) to simply create a plugin or a keyboard shortcut whenever any action came to be so frequently used that I was referring to the Recall Menu for a quicker way to invoke it.
Click on Edit » Preferences » General

Click to check Maximize documents on opening
Click to clear Task Bar Superview
Click to clear Messages Window
Click to clear Actions Bar
Click to clear Workspace
Go to Behavior tab on Preferences dialog
Click to clear Display Recall Menu
Click OK to apply all settings.
Restart HTML Kit.
(If you've been following this tutorial from the beginning, you don't have to save any 'untitled' documents. If the Saved modified files... dialog pops up, click None.)
When HTML Kit restarts, just click on File » New Document
OR
Click on the first icon in the Toolbars section
TO MAXIMIZE THE EDITING WINDOW EVEN MORE ~
You can quickly toggle Full Screen view on and off by pressing F11.
^ Back to list ^
Engage Word Wrap, remove Right Margin and Gutter
WORD WRAP AND MARGINS
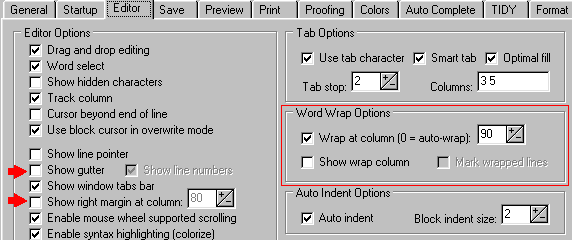
One of my benchmarks for a good HTML editor is how well it handles word wrap. I know of at least two other editors that would have received top marks in my book had it not been for certain annoying bugs or idiosyncracies associated with this option. I'm happy to report that HTML Kit not only handles word wrap very well but also allows you to fine tune it.
Other related options include:
- Show wrap column
- My preference: [clear]
What it does: Does not display a dotted line in the Editing Window indicating the wrap column. - Mark wrapped lines
- My preference: [clear]
What it does: Does not indicate wrapped lines in the gutter. (The gutter is the gray border running up and down the left side of the Editing Window. The gutter also displays line numbers.) - Show gutter
- My preference: [clear]
What it does: Does not display gray border on the left side of the Editing Window containing line numbers (the gutter). If you've got a new blank document open in HTML Kit, press and hold on the Enter key on your keyboard for a bit to see the line numbers displayed in the gutter. Personally, I'm only interested in line numbers when I'm validating my HTML code and even then only when the validation process produces errors that I can't readily find (which is not very often). - Show right margin at column
- My preference: [clear]
What it does: Does not display the line running up and down near the right side of the Editing Window.
Click on Edit » Preferences » Editor

Click to check Wrap at column (0 = autowrap)
In the +/- box next to Wrap at column (0 = autowrap), enter 90
Click to clear Show wrap column
Click to clear Mark wrapped lines
Click to clear Show gutter
Click to clear Show right margin at column
Click OK to apply the settings.
(Number for +/- box next to Wrap at column (0 = autowrap) may vary according to your tastes and screen resolution. I mostly use 800 x 600.)
To quickly toggle word wrap on and off, click on View » Editor » Word wrap
^ Back to list ^
Configuring HTML Kit to use HTML format
OLD-FASHIONED HTML
The default setup for HTML Kit is the XHTML format. For those who don't know, this means that HTML Kit will insert all empty elements (elements only requiring a start tag, e.g.
br, img, etcetera) into the Editing Window with a space and a slash '/' just before the closing bracket. To see this in action, just press Ctrl + Enter on your keyboard and you'll see HTML Kit drop in a line break in XHTML format.Examples of XHTML empty elements:
<br /><img src="mycoolpic.gif" /> Examples of HTML empty elements:
<br><img src="mycoolpic.gif"> If you don't know whether you should use HTML or XHTML then read "HTML or XHTML?" I personally still code using HTML. Some of you hardcore pros can go ahead and call me old-fashioned, living-in-the-past, whatever, but I have my reasons. And I'm not alone. In fact, let's face it... A majority of the web pages out there are still coded in HTML (just surf around a bit and do a random check on the source code of several web pages and you'll see what I mean).
Click on Edit » Preferences » Help...
Click to clear Use XML format -- <tag />
Go to Format tab of Preferences dialog.
Click to check Skip optional empty tag token
Click OK to apply settings.
(If you want to see your new settings in action, press Ctrl + Enter on your keyboard to have HTML Kit drop in a line break in HTML format.)
^ Back to list ^
Modify the Editing Window font
COLOR-CODED SYNTAX
If you've never worked with an HTML editor before (either because you're new to HTML editing or because you've always worked with a WYSIWYG editor) then seeing color-coded HTML in the Editing Window may at first be an eye-boggling experience. But believe me, once you start wading around in a thick morass of elements and attributes (and loving it), that color-coding is going to be a life-saver. The great thing about HTML Kit is that all the color coding is highly configurable in that you can specify exactly what gets colored how. Typically, elements and enclosing angle brackets
<...> are colored Blue while attribute-value pairs are colored Teal.I prefer to have all the text in the Editing Window displayed in Arial 10pt. bold font style along with the typical color-coded syntax (as described above but with a few personal modifications).
Example:
<h3 class="Heading3">Heading text</h3>I also prefer to have .txt files colorized with HTML color coding because quite often I'll open up a blank .txt file and use it as a kind of 'super clipboard' to cut and paste snippets of code to for future reference. Some HTML editors will detect markup regardless of what kind of file it's kept in and will color code it accordingly. With HTML Kit, however, this feature has to be explicitly set.
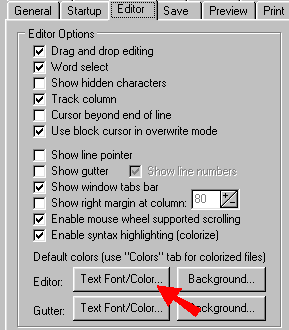
Figure 3 - Screenshot of Editor tab on Preferences dialog
 |
Click on Edit » Preferences » Editor Click on Editor: Text/Font Color... After the Font dialog comes up, press the Delete key on your keyboard and in the Font: text box, type in "Arial" (without the quotation marks). NOTE: Sans-serif fonts like Arial are much easier on the eyes but choose any font you like... Click OK to apply settings. |
HOW TO CREATE A CUSTOM COLORIZED VIEW
You can create your own personalized font file to finetune all the syntactic color coding of the text in the Editing Window. To do this:
Click on Edit » Preferences » Colors.
Click on an item in the Element list to select it.
Click on a color swatch in the Quick Pick box
OR
Click on the Foreground button.
Select a color for the item in the Pick Color dialog.
If necessary, click OK to apply the setting. (Usually just picking the color will apply the setting.)
Repeat for more or all the items in the Element list.
Repeat the same using the Background button (only for the adventurous...)
Then, once you have all your settings made...
Click on Save As.
Type in a file name of your choice and click Save.
Click OK to apply the settings.
TO QUICKLY TOGGLE BETWEEN VARIOUS INSTALLED COLORIZED VIEWS:
Click on View » Colorizer View
Make a selection in the fly-out list. (Default is Standard - White)
HOW TO MAKE .TXT FILES DISPLAY COLORIZED HTML
Click on Edit » Preferences » File Types » Colorized file types...
- Click inside the list of files in the box beside Text:
- Press End on your keyboard to jump the cursor to the end of the list.
- Locate
;txt(should be second last in the list) and delete it. - Click inside the list of files in the box beside HTML, XML:
- Press End on your keyboard to jump the cursor to the end of the list.
- Type in
;txt(don't forget the semi-colon).
^ Back to list ^
Turning off Tags Reminder and Auto-Complete
DON'T TELL ME WHAT TO DO
I'm sure many others will find the Tags Reminder and the Auto-Complete functions very useful but I personally only had one word to describe them.... AAAAAAARRRGGHHH!!!!
HTML Kit contains so many other no-thinking-required no-experience-necessary instant push button wizards and dialogs that, in my humble opinion, the Tags Reminder is just so much overkill. I dare say that —using the default HTML Kit configuration— you could put together a topnotch web page without ever having to type a single HTML tag.
So after configuring the Favourites Menu and installing a few plugins, if it comes to the point where I have to insert an HTML tag or two the hard way, i.e. by actually putting finger to keyboard and typing (...Oh my! Run for the hills, ma! It's the end of the world!) then I say just step aside and let me do it. I don't need to be constantly reminded that there might be an 'easier' way.
So away with the Tags Reminder and, of course, the Auto-Complete function, the latter of which I think in any program is one of the most annoying inventions known to the world of computer software.
To see the Tags Reminder in action, type
< and wait a second or two.To see Auto Complete in action, type
<a and then press the spacebar on your keyboard. (Click No if the Confirm dialog pops up.)Now...
TO TURN OFF TAGS REMINDER
Click on Edit » Preferences » Help
Click to clear Display after (idle time in miliseconds)
Click OK to apply setting.
TO TURN OFF AUTO-COMPLETE
Click on Edit » Preferences » Auto Complete
Click to clear Enable Auto Complete
Click OK to apply settings.
^ Back to list ^
Allow Undo after save
BREAKING THE SAVE BARRIER
All I can say about this is I absolutely wanted this option activated. My typical HTML editing session involves a steady flow of entering new stuff, saving the file, previewing, entering more stuff, saving, previewing, etcetera. If my option to undo was wiped out after every save then I would effectively have no undo option (which would in very short order turn me into a basketcase...)
Click on Edit » Preferences » Save
Click to check Allow undo after save
Click OK to apply setting.
^ Back to list ^
Reload files modified by other programs
AT LAST...!
Many kudos to the genius who thought this one up. As magnificient as it is, there are still one or two things that HTML Kit can't do but other text editors can. Hence if you want to open another editor and make changes to files that are currently loaded in HTML Kit, you don't have to restart HTML Kit just to get it to open the most recent version of your modified files. And not only that but, by using the prompt option, you can actually get HTML Kit to tell you whenever files were changed by other programs.
Wahoo.
Finally a text editor that keeps its eye on everything...
Click on Edit » Preferences » Editor
Click to check Prompt in the Reload Externally Modified Files section.
Click OK to apply setting.
NOTE: The file must be saved to disk in the external program before HTML Kit will detect the changes.
^ Back to list ^
Setting Tabs to 4 spaces and turning off Auto Indent
ABOUT TABS AND AUTO-INDENT
I found the online FAQ dealing with tabs and auto-indents a little confusing and I wasn't even sure if the questions I had were directly related to the answers it was providing. So I struck out on my own and just started fooling around with the settings until I figured out how to do what I wanted to do.
In a nutshell, what I wanted to do was to set the tab to four spaces and have the cursor start at the beginning of each line whenever I created a line break from a tabbed line. By default, when you start off a line by pressing Tab (thus indenting that line), if you break to the next line by pressing Enter, the new line will be automatically indented by a tab. At first I thought this was a cool feature when working with CSS files but then realized that I preferred to have it the 'normal' way (no auto-indent).
I also fumbled around quite a bit trying to get the tab to actually use 4 spaces instead of 2 until I realized that the first two tab stops were being set by the default data in the Columns box [3 5].
This will set all tab stops to 4 spaces and cause the cursor to return to column 1 when you break to the next line (by pressing Enter) from a tabbed line:
Click on Edit » Preferences » Editor
Click to check Use Tab character (default setting)
Click to clear Smart Tab
Click to clear Optimal fill
Enter 4 in Tab Stop box
Clear all data in Columns: box (default setting: 3 5)
Click to clear Auto Indent
Click OK to apply settings.
^ Back to list ^
Phew!
Now just for posterity...
Restart HTML Kit.
Click on the first icon in the Toolbars section
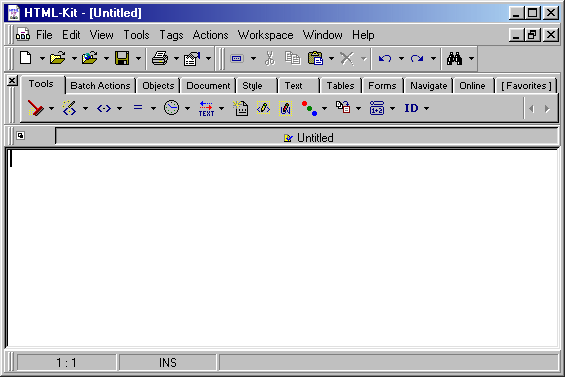
Now then, taking into account that I've resized the HTML Kit program screen so that the screenshot will fit on this web page, your 'cleaned up' version of HTML Kit should look something like this:
Figure 4 - Your new HTML Kit desktop

Now let's show this program who's really the boss and break into some advanced configurations...
Web Hosting 101
Learn about web hosting without the technobabble!
What is Web Hosting?
Best Free Web Hosting
Affordable Domain Names
Affordable Web Hosting
See also:
How to Make a Web Page
Free Website Templates
If you need a .COM web address, you can get one quick and easy at...
| <~ BACK | TOP | NEXT ~> |